I used to read restoration blogs that spanned years and thought to myself, "how can someone take so long to rebuild a bike?". I didn't think I'd be here, seven years in, without a finished product. Hell, I thought I'd be riding the thing after the first 12 months and have sold it to start something else!
Well, here I am, years!! past my "hoped for" completion date, still no finished bike, no progress made in a couple years, the bike a thorn in my side and taking space I could use for other things.
The weather here is starting to get cool enough to work in the garage and I need to get this project out of my life. The goal now, different from when I started, is simply to get the bike running and road-worthy, leaving it to someone else to provide the finishing touches to complete the restoration.
Hopefully, there isn't that much left to do. The engine work is done - provided it will start and run without discovering something internal that still needs attention. I need to finish building my wiring harness, add hoses for fuel and oil, add said liquids, then try to start it. If it actually starts and runs I'm golden, almost. I still need to get a seat.
I hope my next post will be soon, show great progress, and a couple photos. Photos are always fun.
Monday, September 21, 2015
Saturday, August 4, 2012
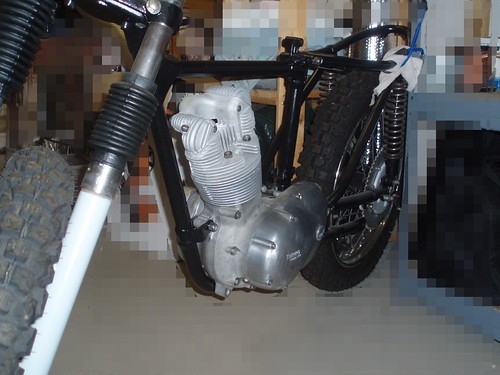
Engine Home To Roost
First I just want to say it's HOT in my garage. The temp here today was 106. It was all of that in my garage but I thought I could stand a few minutes to drop the engine back into the frame. Nothing ever goes as planned so I spent about an hour sweating and cursing before getting the engine nestled back into the frame.
Triumph did NOT plan for this engine to be easily removed or replaced. The lower oil drain bolt interferes at the bottom and the cylinder head interferes at the top. Couple that with the fact that I'm working alone in a hot garage with the bike on the ground and you have for a frustrating process. The one thing that did go well was that I didn't mash even one finger. I'm either getting better at this stuff or was lucky today.
There's more to tell but I'll save that for another time and will just add a few pictures. There's nothing wrong with your eyes or computer. I blurred the background to save myself the embarrassment of the cluttered garage.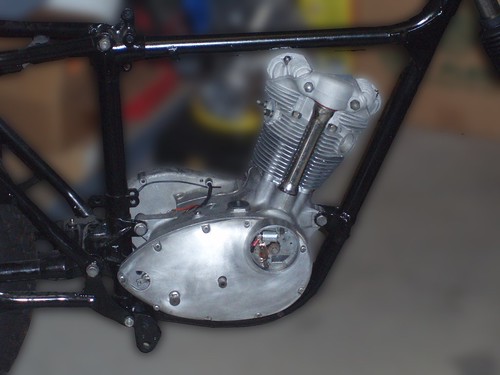
Wednesday, July 18, 2012
Carb Completed
The weather in Phoenix, Arizona this time of year is not conducive to my restoration project as it's VERY hot in the garage and the humidity is too high for my evaporative cooler to be effective. I was motivated to get some work done so I moved inside for the carb rebuild.
One piece of disassembly I hadn't done was removal of the jet block. I wasn't sure how it was connected but a bit of searching led me to believe that it is simply pressed in. It is, in fact, a press-in assembly and a few light taps with a dead-blow hammer using a deep-well socket as a "punch" knocked it right out with no damange. here is a small screw in the carb body that keeps the jet block from rotating that must be removed. The block had a fair amount of oxication holdin it in place but it cleaned right up. My rebuild kit included the paper washer which fits below the jet-block.
I did all the cleaning outside in the morning while it was relatively cool. I'd done some rubbing with scotch-brite pads to get the worst of the grime and oxidation off of the main carb body and used carb cleaner on everything else. I read somewhere that a dip in a 3:1 mix of water:muratic acid would brighten up the aluminum so I figured I'd give that a try too. This treatment helped remove most of the oxidation, especially in the hard to reach corners and crannies. It probably would have done more if I had let the parts soak longer. I only put the parts in the mix for a couple of minutes before reinsing them and neutralizing the acid. A quick spray with silicone lube once dry gave everything a nice luster and should help protect the parts from oxidation.
My rebuild kit included all the gaskets and I also ordered a new float needle. Everything went back together without any issues. The slide and barrel look good and slide well without slop. I shouldldn't have to open her up again unless I have to re-jet one of the circuits after I get her running. I put the needle back in the same groove I found it - assuming it ran that way some time her distant past. I won't know if that was right until she runs.
I need to find a new o-ring to fit between the carb and engine, an air intake tube, and some type of filter and I'll be ready to mix air and fuel.
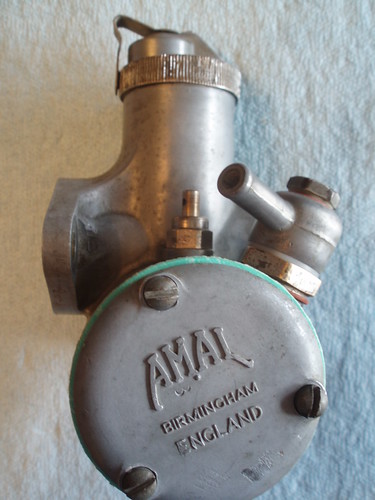
Here is a picture after the clean and rebuild. The carb is an Amal 376.
One piece of disassembly I hadn't done was removal of the jet block. I wasn't sure how it was connected but a bit of searching led me to believe that it is simply pressed in. It is, in fact, a press-in assembly and a few light taps with a dead-blow hammer using a deep-well socket as a "punch" knocked it right out with no damange. here is a small screw in the carb body that keeps the jet block from rotating that must be removed. The block had a fair amount of oxication holdin it in place but it cleaned right up. My rebuild kit included the paper washer which fits below the jet-block.
I did all the cleaning outside in the morning while it was relatively cool. I'd done some rubbing with scotch-brite pads to get the worst of the grime and oxidation off of the main carb body and used carb cleaner on everything else. I read somewhere that a dip in a 3:1 mix of water:muratic acid would brighten up the aluminum so I figured I'd give that a try too. This treatment helped remove most of the oxidation, especially in the hard to reach corners and crannies. It probably would have done more if I had let the parts soak longer. I only put the parts in the mix for a couple of minutes before reinsing them and neutralizing the acid. A quick spray with silicone lube once dry gave everything a nice luster and should help protect the parts from oxidation.
My rebuild kit included all the gaskets and I also ordered a new float needle. Everything went back together without any issues. The slide and barrel look good and slide well without slop. I shouldldn't have to open her up again unless I have to re-jet one of the circuits after I get her running. I put the needle back in the same groove I found it - assuming it ran that way some time her distant past. I won't know if that was right until she runs.
I need to find a new o-ring to fit between the carb and engine, an air intake tube, and some type of filter and I'll be ready to mix air and fuel.
Here is a picture after the clean and rebuild. The carb is an Amal 376.
Thursday, May 10, 2012
Starting On The Carburetor
While I wait for parts to arrive in the mail to finish up engine assembly I decided to get started on the carburetor rebuild. The carb. on the Triumph is an Amal 376. I ordered a complete rebuild kit. All the o-rings, washers, gaskets, and a new float valve. All of the jets looked shockingly clean so I didn't order new ones. I may regret that later but they're not hard to get and I'm not under any real time pressure.
I took a LOT of pictures. Even though I have a parts manual and a service manual for the bike I've found having pictures when you start reassembly to be worth the few minutes it takes to capture them. It also gives me good visuals for my blog posts, which would be boring without without them.
To that end. Here is a before shot of the carburetor to compare with an after shot which I'll take once I'm done. So far I've only got the tear-down complete and some of the parts washed. I'll start polishing up the body next. Not looking for a really shiny finished product but, as you can see from the picture, it's pretty oxidized and dirty right now.
 |
| Amal 376 - Before |
Subscribe to:
Posts (Atom)