Monday, May 31, 2010

Now We're Rolling

Now it feels like I'm really making progress. With a day off for Memorial Day I decided I'd better make some progress on the Cub so I assembled the fork and mounted it, along with the wheels, to the frame to complete the rolling chassis. I had a few problems but you can see the final results. I'm happy with the way things are looking and can't wait to get more work done.

Rolling-01

Rolling-02


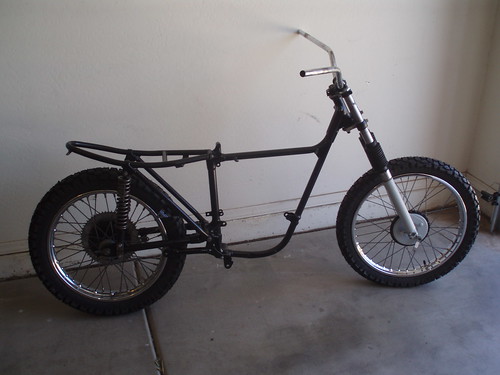
I'm putting together a list of parts I'm going to need to get the engine back together.  That will be the next endeavor.  There is still a long way to go but having a sub-assembly complete is very motivating

Thursday, May 27, 2010

Frame Assmebly Time


FrameAssembly1
Originally uploaded by Gym_x
I planned this post to be a shot of the before and after pictures of the shocks since I spent quite a bit of time rehabilitating them, but I got on a roll and started bolting things together last night.

Since I'm working by myself and didn't have three or four other hands to help hold things I strapped the head to my shelving with the frame sitting on a make-shift work table (a cardboard wardrobe box with a piece of masonite for a top). It isn't perfect and would have been better if I'd have built some sort of frame holding jig, but it got the job done last night.

What you can sort of see in this picture is the completed frame with the rear sub-frame and shocks mounted. the fabricated bushings are great and everything bolted up with only a few headaches. For some reason the rear sub-frame shrank, or was bent, between disassembly and assembly. I had to put the lower bolts in then really pull on the top to get the upper mounting stud in place. I don't remember it being difficult to remove but it was quite a while back - November 2008.

I'm really happy with the results so far and can hardly wait to get the fork reassembled and the wheels on. You can't tell from the cluttered picture but I've actually cleared a spot for the rolling chassis to wait for the engine work to get finished - started first, then completed but you get the gist.

I'm energized to get things moving along more quickly on this project now and need to get on top of ordering parts for the engine work. I only need a few pieces and some gaskets to get thngs moving forward. I'd better get on that.

One more shot of the frame from another angle.


FrameAssembly3
FrameAssembly3
Originally uploaded by Gym_x

Friday, May 21, 2010

Rear Shock - Before

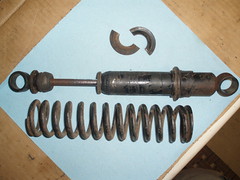
Just a quick teaser. This is a "before" picture of the old shock. You've already seen before and after of the bushings. The whole enchilada is next.

Before picture of shock
Originally uploaded by Gym_x

Thursday, May 20, 2010

Can't Beat These Bushes


New and Old
Originally uploaded by Gym_x
I got my rear shock bushings fabricated this evening and am very happy with how they turned out. The material I got from McMaster Carr was perfect. It seems to be the right hardness, was the right O.D. and wasn't too bad to cut to size and drill to fit the spacers. Only time will tell how it's going to hold up but for the price of two bushings I can make two complete sets for my bike and have some material left over.

I'm painting shock bodies now and will get them reassembled this weekend so I should have a roller by Sunday night, provided I can get a few hours in the garage this weekend. That's provided the leak from my Jeep's radiator doesn't get worse so it takes a higher priority.

The photo shows one pair of the old bushings along with the new ones and the rest of my raw bushing material.

Rear Shock Bushings


P5180048
Originally uploaded by Gym_x
I'm almost ready to assemble the rolling chassis. I'm putting the finishing touches on the rear shocks and the forks now.  Once those are finished I'll be ready for assembly.  The fork gaiters arrived last week and I'll get those mounted this weekend to complete the front.

In the back I'm refinishing the rear shocks and, as you can see from this picture, the bushings are shot. The left is the bushing from the bottom of the shock after it was removed. On the right is the internal spacer from the other side after cleaning it up. I've got some material that's the right outside dimension for the top and bottom and all I need to do is put the right sized holes into it and I'll have bushings as good as new. I hope to get that done this weekend as well.

Hopefully, my next post will have pictures of the rolling chassis.